

How To Separate Date And Time In Excel
Working with Dates and Time
Dates and times in Excel are represented by real numbers, for example "Jan 1 2013 12:00 PM" is represented past the number 41275.5.
The integer part of the number stores the number of days since the epoch and the fractional part stores the percentage of the day.
A appointment or time in Excel is just similar any other number. To display the number as a date yous must apply an Excel number format to it. Hither are some examples:
import xlsxwriter workbook = xlsxwriter . Workbook ( 'date_examples.xlsx' ) worksheet = workbook . add_worksheet () # Widen column A for extra visibility. worksheet . set_column ( 'A:A' , 30 ) # A number to convert to a date. number = 41333.v # Write it equally a number without formatting. worksheet . write ( 'A1' , number ) # 41333.5 format2 = workbook . add_format ({ 'num_format' : 'dd/mm/yy' }) worksheet . write ( 'A2' , number , format2 ) # 28/02/thirteen format3 = workbook . add_format ({ 'num_format' : 'mm/dd/yy' }) worksheet . write ( 'A3' , number , format3 ) # 02/28/xiii format4 = workbook . add_format ({ 'num_format' : 'd-thousand-yyyy' }) worksheet . write ( 'A4' , number , format4 ) # 28-2-2013 format5 = workbook . add_format ({ 'num_format' : 'dd/mm/yy hh:mm' }) worksheet . write ( 'A5' , number , format5 ) # 28/02/thirteen 12:00 format6 = workbook . add_format ({ 'num_format' : 'd mmm yyyy' }) worksheet . write ( 'A6' , number , format6 ) # 28 Feb 2013 format7 = workbook . add_format ({ 'num_format' : 'mmm d yyyy hh:mm AM/PM' }) worksheet . write ( 'A7' , number , format7 ) # February 28 2013 12:00 PM workbook . shut () 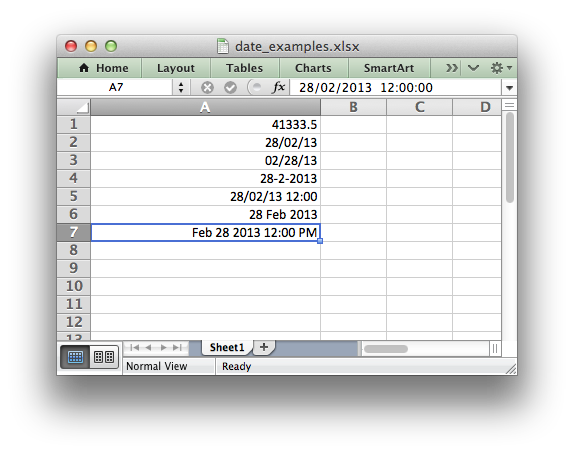
To make working with dates and times a little easier the XlsxWriter module provides a write_datetime() method to write dates in standard library datetime format.
Specifically it supports datetime objects of blazon datetime.datetime , datetime.engagement , datetime.time and datetime.timedelta .
At that place are many way to create datetime objects, for example the datetime.datetime.strptime() method:
date_time = datetime . datetime . strptime ( '2013-01-23' , '%Y-%k- %d ' ) Run into the datetime documentation for other date/time creation methods.
As explained higher up you also need to create and utilize a number format to format the appointment/time:
date_format = workbook . add_format ({ 'num_format' : 'd mmmm yyyy' }) worksheet . write_datetime ( 'A1' , date_time , date_format ) # Displays "23 January 2013" Here is a longer case that displays the same date in a several different formats:
from datetime import datetime import xlsxwriter # Create a workbook and add a worksheet. workbook = xlsxwriter . Workbook ( 'datetimes.xlsx' ) worksheet = workbook . add_worksheet () bold = workbook . add_format ({ 'bold' : True }) # Aggrandize the first columns so that the dates are visible. worksheet . set_column ( 'A:B' , xxx ) # Write the column headers. worksheet . write ( 'A1' , 'Formatted appointment' , bold ) worksheet . write ( 'B1' , 'Format' , assuming ) # Create a datetime object to use in the examples. date_time = datetime . strptime ( '2013-01-23 12:thirty:05.123' , '%Y-%m- %d %H:%M:%S. %f ' ) # Examples appointment and fourth dimension formats. date_formats = ( 'dd/mm/yy' , 'mm/dd/yy' , 'dd m yy' , 'd mm yy' , 'd mmm yy' , 'd mmmm yy' , 'd mmmm yyy' , 'd mmmm yyyy' , 'dd/mm/yy hh:mm' , 'dd/mm/yy hh:mm:ss' , 'dd/mm/yy hh:mm:ss.000' , 'hh:mm' , 'hh:mm:ss' , 'hh:mm:ss.000' , ) # Start from start row later on headers. row = 1 # Write the same appointment and time using each of the above formats. for date_format_str in date_formats : # Create a format for the date or time. date_format = workbook . add_format ({ 'num_format' : date_format_str , 'align' : 'left' }) # Write the aforementioned appointment using different formats. worksheet . write_datetime ( row , 0 , date_time , date_format ) # Too write the format string for comparison. worksheet . write_string ( row , one , date_format_str ) row += 1 workbook . shut () 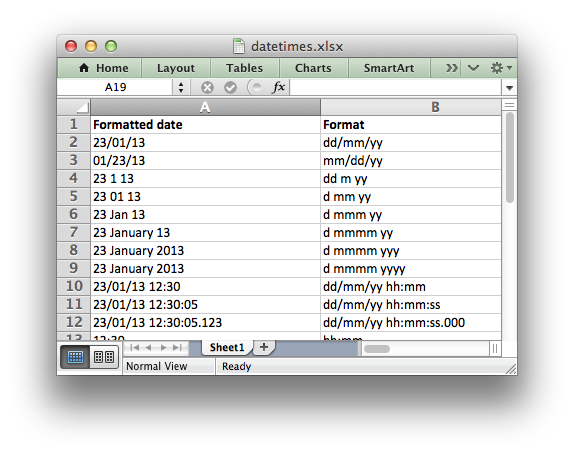
Default Date Formatting
In certain circumstances you lot may wish to apply a default engagement format when writing datetime objects, for case, when handling a row of data with write_row() .
In these cases it is possible to specify a default appointment format string using the Workbook() constructor default_date_format option:
workbook = xlsxwriter . Workbook ( 'datetimes.xlsx' , { 'default_date_format' : 'dd/mm/yy' }) worksheet = workbook . add_worksheet () date_time = datetime . now () worksheet . write_datetime ( 0 , 0 , date_time ) # Formatted equally 'dd/mm/yy' workbook . close () Timezone Handling
Excel doesn't support timezones in datetimes/times then there isn't any neglect-safe way that XlsxWriter can map a Python timezone aware datetime into an Excel datetime. Every bit such the user should handle the timezones in some way that makes sense according to their requirements. Commonly this volition crave some conversion to a timezone adjusted time and the removal of the tzinfo from the datetime object so that it can be passed to write_datetime() :
utc_datetime = datetime ( 2016 , ix , 23 , 14 , 13 , 21 , tzinfo = utc ) naive_datetime = utc_datetime . replace ( tzinfo = None ) worksheet . write_datetime ( row , 0 , naive_datetime , date_format ) Alternatively the Workbook() constructor option remove_timezone tin be used to strip the timezone from datetime values passed to write_datetime() . The default is False . To enable this option apply:
workbook = xlsxwriter . Workbook ( filename , { 'remove_timezone' : True }) When Working with Python Pandas and XlsxWriter you can pass the argument every bit follows:
author = pd . ExcelWriter ( 'pandas_example.xlsx' , engine = 'xlsxwriter' , options = { 'remove_timezone' : True }) 
Source: https://xlsxwriter.readthedocs.io/working_with_dates_and_time.html
Posted by: johnsonnoned1998.blogspot.com
0 Response to "How To Separate Date And Time In Excel"
Post a Comment